
It is always a good practice to watermark the images before inserting them in your blog post, watermarking is the best way to prevent content theft and it is recommended by WordPress too. In this article we have come up with a short tutorial on how to watermark the screenshots in bulk with your brand.
We are going to use Faststone image viewer, which is a free image viewer and image editor tool that has the list of useful features. Though Faststone image viewer’s interface looks bit older comparing to Google Picasa, it is incorporated with many useful features and tools to play with your images. So let’s get started.
Steps to Batch Watermark Images Using Faststone Image Viewer
- First of all download the Faststone image viewer and install it, if you already installed this tool then proceed to next step
- Open the software and navigate to the folder where you have kept your screenshots
- Select the screenshots which you want to add watermark, use Ctrl+A if you want to select all images of the folder
- Now click on “Batch convert selected images” under tools menu, batch convert dialog box appears

- Click on “Advanced Options” button and move to watermark tab, now check “Add watermark” check box and you will have watermark properties on the screen

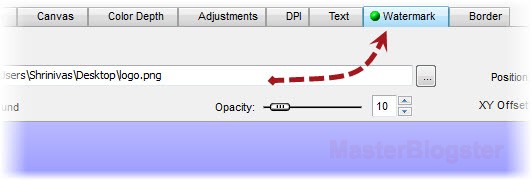
- Now it’s the time to select your logo, choose your logo from watermark image option and set the opacity of around 5 to 10. You can also drag your logo and place it wherever you wish in preview screen.
- Click on “OK” once done with watermark settings, Now uncheck the “Output folder” check box to overwrite existing images with watermarked images.
- Finally hit “Convert” button watermark images, the software asks whether to save in original folder? Say “Yes to all”.
That’s it, all the selected images will have your blog’s watermarked logo on them. Faststone image viewer has an option to save the settings which saves your time, save the watermark settings you made to file which can be loaded next time and applied to the new screenshots.