FeedBurner is the most popular web feed management system by Google on which most of the bloggers rely upon to burn the RSS feeds. Before knowing how to setup FeedBurner for WordPress blog, we will first have a look at what exactly is RSS feed and Feedburner.
What is RSS Feed?
Most of the newbies ask the same questions- what is RSS feed? And what is Feedburner? RSS stands for “Really Simple Syndication”, in simple words RSS is a subscription system which notifies you whenever a website publishes new article. The sole intention of RSS is to get updates via email when the subscribed website comes up with the new content.
Feedburner acts as conveyer between your blog and your blog’s subscribers, it tracks your blog for new content and informs about it via e-mail to the people who are subscribed for your blog.
In this article you are about to know how to setup FeedBurner for WordPress blog so that the people who subscribe to your blog can get updates whenever you publish new articles.
Also read:
- How to know if Blog Comment is Dofollow or Nofollow?
- Best WordPress Plugins to Show Related Posts of Your Blog
How to Setup FeedBurner for WordPress Blog?
Setting up your WordPress blog with Feedburner is a pretty simple task which will hardly take less than 5 minutes. All you need is a Gmail account and your blog feed URL to setup Feedburner with WordPress blog, by default blog feed URL is like www.yoursite.com/feed. Ok, let’s get started with Feedburner setup for WordPress blog.
- Navigate your browser to Google Feedburner website and sign in with your Gmail account.
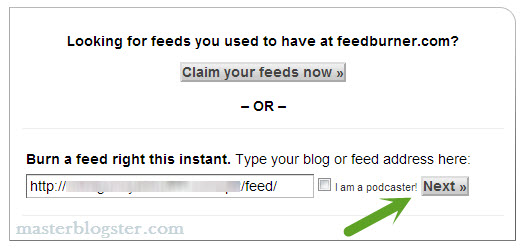
- Copy and paste your blog feed URL in “Burn a feed right this instant” input box

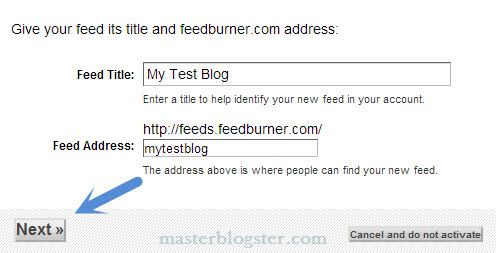
- Click on the “Next” button, feedburner will automatically fetch your website title which will be displayed in feed title, specify the feed address (This is your blog’s Feedburner ID), name it just like your website title without spacing as it is the URL for your Feedburner feeds.

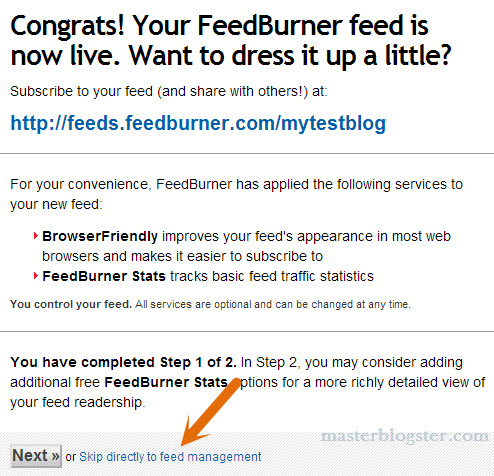
- Click on “Next” button and your Feedburner feed will be created. Here you will get your Feedburner URL, copy it to the notepad, you need the same URL in step 8.
- Now click on “Skip directly to feed management” to manage your feedburner account, here you can analyze your feed stats and you can also come to how many people are subscribed to your feeds.

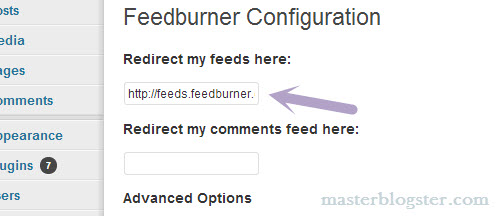
- Now it is time to redirect your default WordPress feeds to Feedburner feeds you just created, for this task you can use FD Feedburner plugin which is pretty easy to use
- Install FD Feedburner plugin and activate it in your WordPress website
- Go to “Setting >> Feedburner” option and paste your Feedburner URL which was copied to notepad in 4th step of this tutor, finally click on “Save” button.

That’s it, you have successfully configured FeedBurner with your WordPress blog. Now if you type your blog feed URL such as www.yoursite.com/feed you will be redirected to your blog’s Feedburner URL.
Once configured FeedBurner with WordPress you can install Feedburner subscription form plugin in your blog so that your readers can easily subscribe to your blog to get updates.
What is My Blog’s Feedburner ID?
So you might ask “what is my feedburner ID?“, the answer is quite simple, the feed address which you entered in step 3 is your blog’s Feedburner ID.
I hope this article has clarified what is RSS feed and Feedburner and I am sure will subscribe to MasterBlogster.


